
"Handsome Cables" Knitted Baby Boy Cardigan Free Knitting Pattern
When expecting my fifth baby, I decided to knit a "going home" outfit in blue, in case the baby was boy, and in pink, if it was a girl (I did not know what I was having). The idea was that once the baby is born, it will be dressed in the appropriate outfit, and the unused set would end up being a doll's outfit for other kids to play with.I love cables and I love lace, so the idea for "Handsome Cables" Baby Boy cardigan pattern was born.
 |
"Handsome Cables" Top Down Raglan Style Baby Boy Cardigan Free Knitting Pattern |
Copyright Notice
Feel free to share a link to this pattern by linking to my blog and giving copyright credit to © CraftsAdore, but do not copy the pattern and claim as your own. The pattern is as-is, and I cannot provide any individual support on it. This pattern may not be used to produce items for commercial purposes - you may knit from this pattern for own personal use only or for charity. Please feel free to share your finished project by adding your comment to this post. ❤ Happy Knitting! ❤
"Handsome Cables" Top Down Raglan Style
Baby Boy Cardigan Free Knitting Pattern
Key:
K - Knit Stitch
P - Purl Stitch
C4F - Cable 4 Front
C4B - Cable 4 Back
K2tog – knit two together
YO – yarn over
PSSO – pass the slipped stitch over
Sl 1 – slip one st knitwise unless otherwise stated
SSK – slip slip (knitwise) knit through the back loop
K2Tog tbl – knit two together through back loop
x - e.g. x2 or x3 - repeat that many times the pattern in the preceding round () brackets
x - e.g. x2 or x3 - repeat that many times the pattern in the preceding round () brackets
Level : Advanced Beginner
Tags : Newborn, Newborn-size, Baby, Top-Down, Raglan, Cardigan, Sweater, Buttoned, Seamless, Hospital, Home Coming, Layette
Yarn: DK or Worsed Yarn,
Gauge: 5st per 1inch, (20st per 4 inch), 7 rows per 1 inch (28 rows per 4 inch)
Chest: 18” (0-6 months) - CO 56st
Length from back of neck: 10” (make it 12” if want longer)
Sleeve length from under arm: 5-6”
across shoulders: 7.25”
Equipment: 4 markers in one color (marker PM), and 4 markers in another color (marker IM)
4mm UK / 6 US long circular needles for main body & sleeves on magic loop
3.25mm UK / 3 US long circular needles for cast on of neck & bottom rim and sleeve rims
Cable needle
Cast On:
Using 3.25mm circular needles (knitting back and forth, not in the round),
CO 54 st , using long tail method (it is then increased to 68 st in row 6)
Collar: (in seed rib stitch aka hurdle stitch)
Row 1 WS: Sl1 purlwise, Knit (this will be the wrong side of your work)
Row 2 RS: Sl1 purlwise, *K1, P1; repeat from * to last st, K1.
Row 3 WS: Sl1 purlwise, Knit to end
Row 4 RS: Sl1 purlwise, *K1, P1; repeat from * to last st, K1.
Row 5 WS: Sl1 purlwise, Knit to end
Row 6 RS: Sl1 purlwise, *K1, P1; repeat from * to last st, K1.
Row 7 WS: Sl1 purlwise, Knit to end
Row 8 RS: Sl1 purlwise, *K1, P1; repeat from * to last st, K1,
Row 9 WS: CO 7st, Sl1 purlwise, Knit to end, turn work & CO 7st (68st)
Set up “increment” stitch markers (IM) and “pattern markers” (PM) as follows:
(IM markers are shown in Red on my picture below, and PM markers Blue and Black)
(IM markers are shown in Red on my picture below, and PM markers Blue and Black)
7st (rim PM) - 10st (front 1 IM) – 7st (sleeve IM) – 20 st (back IM) – 7st (sleeve IM) – 10st (front 2 PM) – 7st (rim PM),
(you will only use 2 PM to start, the others will be used after row 22 - see special notes below)
(you will only use 2 PM to start, the others will be used after row 22 - see special notes below)
 |
| Knitted Baby Boy Cardigan Free Pattern |
Yoke (with increments done on RS rows only):
Switch to 4mm circular needles
Row 1 (RS):
Rim 1: Sl1 purlwise, (P1, K1) x3
Front 1: [P2, K1, YO, SSK], [P2, (C4B) x2, P2], [K1, YO, SSK, P2]
Sleeve: K all st to 1 st before next IM, KFB, slip IM, KFB
Back: K all st to 1 st before next IM, KFB, slip IM, KFB
Sleeve: K all st to 1 st before next IM, KFB, slip IM, KFB, K any stitches to PM
Front 2: [P2, K1, YO, SSK], [P2, (C4F) x2, P2], [K1, YO, SSK, P2]
Rim 2: (K1, P1) x3, K1
Row 2 (WS):
Rim 1: Sl1 purlwise, K6
Front 1: [K2, P3], [K2, P8, K2], [P3, K2]
Sleeve: P all st, slip IM
Back: P all st, slip IM
Sleeve: P all st, slip IM, P any stitches to PM
Front 2: [K2, P3], [K2, P8, K2], [P3, K2]
Rim 2: K7
Row 3 (RS):
Rim 1: Sl1 purlwise, (P1, K1) x3
Front 1: [P2, K2tog, YO, K1], [P2, K2, C4F, K2, P2], [K2tog, YO, K1, P2]
Sleeve: K all st to 1 st before next IM, KFB, slip IM, KFB
Back: K all st to 1 st before next IM, KFB, slip IM, KFB
Sleeve: K all st to 1 st before next IM, KFB, slip IM, KFB, K any stitches to PM
Front 2: [P2, K2tog, YO, K1], [P2, K2, C4B, K2, P2], [K2tog, YO, K1, P2]
Rim 2: (K1, P1) x3, K1
Row 4 (WS):
Rim 1: Sl1 purlwise, K6
Front 1: [K2, P3], [K2, P8, K2], [P3, K2]
Sleeve: P all st, slip IM
Back: P all st, slip IM
Sleeve: P all st, slip IM, P any stitches to PM
Front 2: [K2, P3], [K2, P8, K2], [P3, K2]
Rim 2: K7
SPECIAL NOTES FOR FRONT1/FRONT2 Cable Pattern & increases:
First few row repeats will not have enough stitches yet to complete full "Front 1"/"Front 2" patterns, so until the increments are added, you can only fit as much as you can of the cable repeats (i.e. first several stitches of pattern st for "Front 1", and last several stitches of pattern st for "Front 2" – if there is not enough stitches to do a full cable pattern, just K those stitches). This way you will have at least partial cable pattern "squeezed" to fit into this space and it will look nicer than just knitting those stitches. For example:
Row 1 - Front 1 Do the first and Third brackets, end with a kfb.
Row 3 - Front 1 do first bracket, {Knit all stitches for First cable bracket bit} Purl 2, knit 3, End with a Kfb. Front 2 KFB, Knit 3, purl 2 and do last bracket.
Row 4 - Front 1 knit 2 purl to marker. Front 2 purl to last two and knit those.
Row 5 - Front 1 do first bracket, Purl 2, Knit 4, Kfb. Front 2 kfb, Knit 4, Purl 2, Do last bracket.
Row 7 - Front 1 Do first bracket, purl 2, knit to last stitch, kfb. Front 2 work front 1 backwards.
Row 9 - Front 1 Do first bracket, do up two second cable and kfb in last stitch of cable. Now have enough stitches to work the cables and the increases will be easy to add in the pattern now. Front 2 slip 2 st on cable needle, KFB then work stitches on cable needle, continue in pattern.
SPECIAL NOTES FOR MARKERS SET UP:
On first 22 rows, PM and IM will actually be in the same position (so you can use just IM) - KFB 1 st before and after marker.
Once you reach 22st on Front 1 & 2, you can place a PM and you’d be K those extra st between PM and IM on RS, and P on WS, remembering to increase 1 st before and after IM by KFB on RS only till row 32.
 |
| Knitted Baby Boy Cardigan Free Pattern |
Continue in pattern - i.e. repeat 1-4 pattern till 32 rows as follows (rows in bracket - don't forget to add button holes):
RS Row 1 pattern: 1, 5, (9), 13, 17, (21), 25, 29
WS Row 2 pattern: 2, 6, 10, 18, 22, 26, 30
RS Row 3 pattern: 3, 7, 11, 19, 23, 27, 31 Boys Button Rows: (9), (21), (33) i.e. every 12 rows (see “Single Button Row” instructions) on Rim 1
WS Row 4 pattern: 4, 8, 12, 20, 24, 28, 32
 |
| Knitted Baby Boy Cardigan Free Pattern |
Main Body:
Divide work for fronts & back and sleeves:
Row 1 : Continue as per pattern to sleeve marker (DON’T forget the button hole), K2, CO 5st using cable cast on, slip Sleeve rest of stitches on spare yarn, continue pattern to next Sleeve marker, K2, CO 5st, slip Sleeve stitches on spare yarn, continue in pattern till end. Remove all IMs, Continue with Row 2-4 pattern.
Repeat row 1-4 till back from collar measures 8’’ (about 8 repeats), or continue for longer if prefer longer style e.g. 10’’, but without any more IM, (keep PM and follow Rims & Front1/2 patterns).
Row 1 & 3, knit between “pattern” markers
Row 2 & 4, purl between “pattern” markers
 |
| Knitted Baby Boy Cardigan Free Pattern |
Bottom Rim:
Switch to 3.25mm needles
Repeat seed rib stitch for 9 rows as per collar pattern, starting on RS pattern:
RS : Slip first stitch purlwise, *K1, P1* repeat till end
WS: K all stitches
BO on WS: K1, *K1, Slip second st over first st * repeat to end
Single Row Button:
If you need visual help on single row button technique, there are some great youtube videos, e.g.
https://www.youtube.com/watch?v=EY4vBzLo-Xs
If you need visual help on single row button technique, there are some great youtube videos, e.g.
https://www.youtube.com/watch?v=EY4vBzLo-Xs
Step 1: Once you have reached to row in your knitting where you want to place the button (i.e .row 9 in this pattern, and then (21), (33) i.e. every 12 rows - depending how many buttons you want, I did 3), first do (Sl1 purlwise, K1, P1), then bring the working yarn forward and continue as follows:
Step 2: Slip the next stitch from your main needle purl wise.
Step 3: Bring the working yarn back.
Step 4: Slip the next stitch from your main needle purl wise again.
Step 5: Pass the second stitch on your working needle over the first stitch.
Repeat steps 4 and 5 for as many stitches as is needed to fit your button (x2). Slip last st back on main needle
Step 6: Turn your work over.
Note: You may want to pull very tight on your working yarn before the next step and continue pulling tight for the first stitch. This will prevent or limit holes next to the buttonhole.
Step 7: Using the cable cast on, add the same number of stitches as was bound off to your main needle + 1. (3st)
Step 8: Turn your work over again.
Step 9: Slip the next stitch from you main needle purl wise.
Step 10: Pass the additional stitch from you cast on over the first stitch on your working needle.
Step 11: Pass the first stitch on your working needle back to the main needle.
Step 12: Work the next stitch in pattern and continue knitting as normal.
Note: You may need to k2tog/ p2tog or through the back loop to tighten up any loose stitches.
 |
| Knitted Baby Boy Cardigan Free Pattern |
Sleeves:
Transfer stitches from spare yarn, join in round, picking up & knitting into extra 10 st from under arm. Continue to knit in round till under arm measures 4”.
Switch to 3.25mm and repeat seed rib pattern for 10 rows:
Round 1 : *K1, P1*, repeat to end.
Round 2 : P all st
BO in purl pattern.
Note: sleeves knitted in the round will not match exactly the gauge of main body, so either knit more loosely, switch to larger needles or knit flat and then sew the edges under arm.
 |
| Knitted Baby Boy Cardigan Free Pattern |
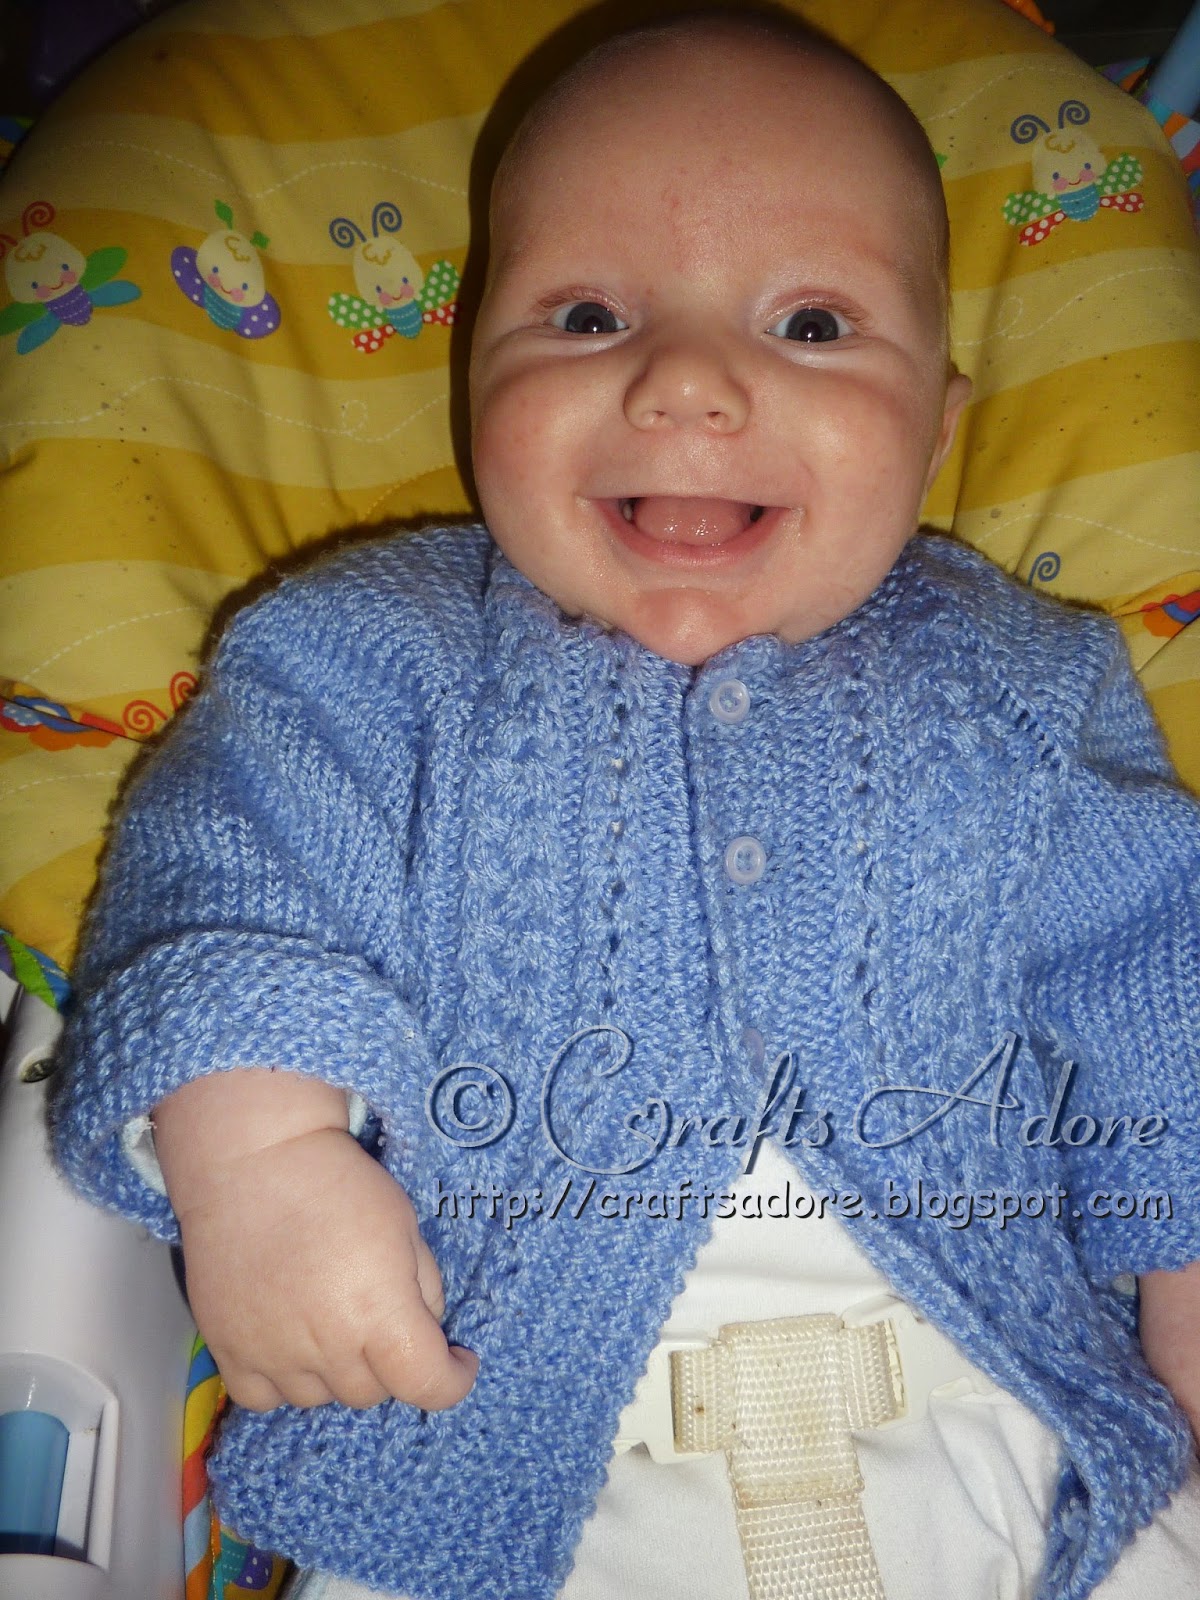
Update: my baby ended up being a boy, and this blue cardigan, together with a Gnome hat and some knitted converse booties, was my favourite outfit for him for the first 6 months. And the beauty of this design is that if the cardigan is a bit too big, you just roll up the sleeves, and once it gets too small, the sleeves become 3/4 style, so I actually managed to get a year's worth wear out of it, which made all this knitting worth it!.
 |
| My Baby Boy @ 2 weeks old in his handsome cables baby cardigan |
 |
| Happy in his baby cardigan @ 10 weeks |
 |
| And still loving it @ 6 months |
Please feel free to share your finished project by adding your comment to this post. ❤ Happy Knitting! ❤
Can we do this with double pointed needles????
ReplyDeleteI guess so, I don't have any experience of knitting in the round on double pointing needles...
DeleteThis comment has been removed by the author.
DeleteCould I knit this with size 8 needles for a 6 mo old baby?
ReplyDeleteI forgot to check box for "notify me".....on previous comment. I'm anxiously waiting to get started on this for a 6 month old baby boy for this winter! He was just born! I wanted him to be "ready" for fall & winter! I had asked if I could use size 8 needles, & Caron Simply Soft yarn. Stitch gauge is 18 sts, & 24 rows in 4 inches. Thankyou, the pattern is amazing! Love it!
ReplyDeleteJudging by the date of the comments before me (Sept 2015) I may not get a reply back, for a while...... bummer, I really wanted to knit "this" sweater for a 6-12 mo old by increasing the size.....oh....fooey....
ReplyDeleteSomething is not right with this pattern. I've just started with the Yoke. I have 68sts to start. Rim 1=7 st, front 1=10 sts, sleeve 1=7sts, back=20sts, sleeve 2 = 7sts, front 2= 10st, rim =7. Now, to the yoke pattern. Rim one: Sl1 purlwise, (P1, K1) x3. (This adds up to 7) Front 1 [P2, K1, YO, SSK], [P2, (C4B)x 2, P2], [K1, YO, SSK, P2]. Just by eyeballing this, you can know that total sts for front 1 exceeds 10. Please correct me if I'm wrong.
ReplyDeleteDid you ever get this sorted, coz I’m confused as well
Deletewe create best clothing to wear for our customers.We make all kinds of clothing accessories for men and women.Just come and see for yourself:baby girls knitted dress
ReplyDeletein UK
Calfskin is a multipurpose and sharp regular material cheap leather jackets. You can follow the given tips for washing cowhide coats:
ReplyDeleteLooking Smart is a typical thing now we follow numerous patterns and clothing's to make ourself look stunning, Leather Jackets are normally basic clothing which we follow to make our character cooler.leather jacket We put 5 Slim Fit Jacket Ideas to flabbergast yourself and make your persona more popular from others
ReplyDeleteLooking Smart is a typical thing now we follow numerous patterns and clothing's to make ourself look stunning, Leather Jackets are normally basic clothing which we follow to make our character cooler.leather jacket We put 5 Slim Fit Jacket Ideas to flabbergast yourself and make your persona more popular from others
ReplyDeleteIt is morthemselves from the basic temperature in the cockpit; that is the reason they were known as Flight coatsbrown leather jacket.Starting at now, earthy colored shading coats are viewed as a symbol style among the youthful age. e seasoned than the dark coat since it was first utilized in WWII. Pilots wore it to spare.
ReplyDelete786shop One of Pakistan's most popular clothes brands started in 2000. It has made considerable progress in a short period of time and has opened stores across Pakistan USA Uk. They have both Eastern and Western attire, ranging from simple and casual attire to formal attire, all with elegant and light attire. Find it online.
ReplyDeleteBuy now for baby boys clothing sets on Volgo Point. and .Baby Boys' 2 Pieces Shirt Shorts Set shopping made fun now at Volgo Point.
ReplyDeleteSweater Baby Boy Girl
Started to knit this but am confused with “front 1” = 10sts initially - Row 1 : [p2, k1, yo, ssk], [p2 (c4b) etc is more than 10sts?? Why [ ]? And that’s just Row 1 front 1 - all following rows don’t add up to me
ReplyDelete